Archive for the 'embroidery' Category

Covered

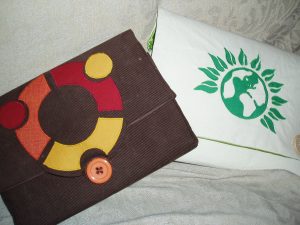
Dan recently bought himself a new gadget: an Acer Aspire. As usual I set about making a cover for it. As his first act was to remove the Windows 7 installation that it came with and install the latest Ubuntu netbook image I thought that a design based around the Ubuntu logo would be most appreciated.

Once I had decided to use the Ubuntu logo the inspiration to use one of the outer circles as a fastening was almost instant. A quick trip to C&H for the necessary fabrics and a big orange button and I was ready to go. The cover is a simple lined envelope, with craft vilene, to give structure, and wadding, to cushion the laptop.

On a roll, I used the same method, and some fabrics I had left over from previous projects, to make a similar case for my own laptop.

Recent makes

I’ve been fairly busy lately, and quite a bit of the busy-ness has been with things that aren’t pretty or bloggable. However here are a few of the things that have emerged from my lair over the past couple of week

Valentine’s Day Card
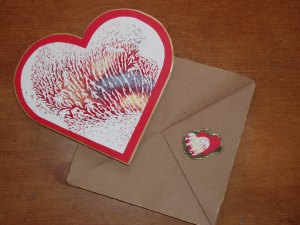
I spent a couple of hours making this card for Dan. The decoration on the front is what my C&G tutor calls an ‘ooh-aah print’. The technique for creating them is very simple and produces gorgeous, semi-random effects. Take two perspex sheets, the kind you get with cheap clip together photo frames; put some dabs of paint on one of them in various colours and patterns; smush the two sheets together and rub them back and forth to lightly blend the edges of the areas of colour, don’t mix around too much or the colours will get murky. When you peel the perspex sheets apart the paint will pull away into these random veined patterns. You can then use the perspex for printing on to paper.

The envelope is a simple, brown paper, untwisting pocket, similar to the top compartments on the Folded Secrets booklet.

Dan, however, totally outdid me on the Valentine’s Day effort.

Panel
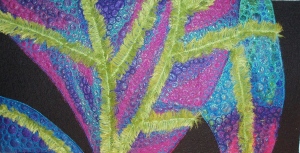
This is a piece of assessed work for my course, a panel inspired by a picture of a deep purple leaf with green veins and multitudes of minuscule water droplets on the surface. The colourway skewed towards the blue in construction, mainly due to the materials I was able to source. As a result I found that I had something very similar in colour and fabric construction method to the Dodecahedron Bag that was my first assessed piece. On the plus side this means that my (looming) final exhibition will have a fairly unified colour scheme. On the minus side I was disenchanted with this piece before I was halfway through. Foolishly I had chosen to make it enormous, that is enormous for me – given that I had to cover every bit of that fabric with machine embroidery.

Mounting and displaying

On the subject of that looming exhibition, the other week it was time to take out all of the work I had done over the past year and a half, and take stock of it. While it was interesting remembering all the things I had done, it was worrying the number of unfinished, or in some cases unstarted, things I have to complete before June. This is on top of regular course work, and doing another two assessed pieces.

In addition a lot of that wonderful stuff that I have completed will need to be mounted or otherwise displayed. I spent quite a bit of time mounting small stitched samples in mount board. There are other pieces that I’m planning different methods of display for. The only one I think worthy of showing here is the canvaswork sampler that I decided to mount in a cushion.

Calico shopping bags for Christmas

Niketa bag

Niketa bag

Xine bag

Xine bag

Madii bag

Madii bag

Three more calico bags made as Christmas presents. There were 5 in the set that I made, but unfortunately I had wrapped the first two before I remembered to take pictures.

Calico shopping bags

My most recent project was making shopping bags for some of my friends. Reusable shopping bags are very useful and have a large area for personalisation.

The bag are simple, flat rectangles made from one piece of fabric, double thickness for strength and so that the back of the stitched design is covered to prevent it being damaged by contact with the bag’s contents.

The designs were the fun part. Each design consists of fabric painted text with surrounding decoration, respectively applique, machine stitch, and false flowers and machine stitch.


The fonts I found on www.fontspace.com and copied by hand to paper. On paper I coloured them in in black pen which made the lettering easy to trace onto the calico in fabric paint with a fine brush.

“Measure twice, cut once.”


P6300001

Originally uploaded by Kat Shann

My Dad always used to say this. It was once of many phrases related to projects. Other gems include “man on a galloping horse wouldn’t notice”, and “fast as a church tied to a hedge”. (That’s fast as in held fast, or “securely fixed in place”, not fast as in speedy.)
Of those sayings “measure twice, cut once” seemed the most sensible and the least obscure. I’m sorry to report that I failed in this regard this weekend.
A friend recently purchased an Acer Aspire and asked me to make a cover for it. At the point I was asked I was a little busy fixing a bunch of other people’s clothes, and the Acer was busy getting some boot issues fixed. So I had a quick measure of the Acer’s supplied fabric case. I measured once, not even the right thing, and made sure to add 1.5 cm ease in each dimension (and 1 cm seam allowance).
The next day I got up bright and early and whipped up the pictured case before breakfast. Every part of construction went perfectly, which almost never happens.
You can guess the end of the story. The supplied case was slightly stretchier than I’d accounted for, the Acer didn’t fit into the case.
Gutted.
Back to the cutting board I guess – with proper measurements this time.

Quick post

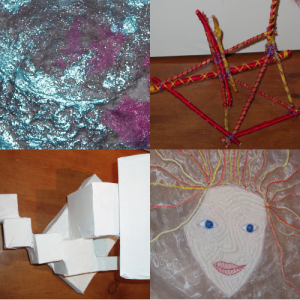
fourpiecesJust a quick one to update on the sorts of things we’ve been doing at City and Guilds in the past few weeks. Clockwise from the top left:
1) Making paper, and paper bowls.

2) Wrapping sticks with fabric and tieing them together into structures (unfinished)

3) Quilting

4) Making structures out of boxes and painting them white.

All of this was for the 3D section of the course. Which wasn’t quite as much fun as I though it would be. Next week we get started on texture.

Dodecahedron – Assessed Bag Part 2

So I’ve finally finished my assessed piece for City & Guilds Creative Embroidery.

It’s a dodecahedron bag made from pentagons of constructed fabric attached by herringbone insertion stitch, machine cord, and handmade beads. It’s lined with a silk crepe – chosen for its colour. Though I think if I was making a bag for use rather than display I might have looked a little further for a hardier fabric in the right colour.

I love it. It turned out much pinker than I thought, my initial design was more purple. The buttons are my least favourite part, but I guess I could replace then at a later date.

Valentine’s Day

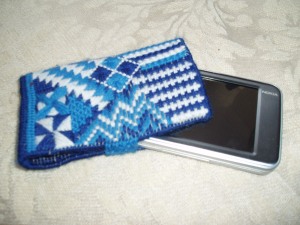
Canvas case for Dan's Nokia 810

Canvas case for Dan's Nokia 810

For Valentine’s Day I made Dan a canvaswork pouch for his Nokia 810. It’s made in the same colours as my canvaswork sampler which Dan expressed a liking for.

Update: Edited the title of this post from St. Valentine’s Day to Valentine’s Day as I was informed that it hasn’t been a saint’s day since 1969. My bad.

Geekifying my girliness (Assessed Bag Part 1)

This is a mirror to my earlier post about ‘girlifying my geekiness‘ by making a pretty, lacy case for my internet tablet. I can’t help getting aesthetic about geeky things, and it seems I also can’t help but get geeky about arty things.

In City & Guilds we are currently half way through making a bag for an assessed piece of work. Week before last we were asked to create a design for the bag and my after a few initial ideas my mind kept returning to platonic solids. I’m such a maths geek! Tetrahedron or dodecahedron were favourites. In the end I plumped for the latter because it is made up of pentagons, and they are more interesting than triangles. (I’m sure normal people don’t have favourite geometric constructions).

Once I had inserted a measure of geekiness into the undertaking I took to it with enthusiasm, drawing up designs and creating a mockup out of some scrap grey felt.

On Thursday in C&G we spent the time creating the fabric from which to construct the bag, by the same method I used to make the needlecase and my notebook covers.

The fabric took ages to make, putting together tiny pieces of fabric on a felt background and then stitching all over it so much that the fabric base can barely be seen.

Once I’ve got all of the fabric made I’ll cut it into little pentagons and stitch these together with an insertion stitch, which will allow the contrasting lining to show through. Construction will occur on Thursday @ C&G. Stay tuned for pics of the finished thing.

Girlifying my geekiness

Front

Back

Recently I came into possession of Dan’s old Nokia 770 internet tablet. It was a fairly pretty thing as gadgets go, black and silvery plastic, but kind of square and clunky. I thought I’d take the edge off of the geekiness by making a pretty, embroidered, pink case. Well partly pink at least.

The case is machine lace. I made a paper template of the gadget’s shape including areas to be left open – one at the bottom for cables, and another for the screen, which is under the flap at the front. I traced this template onto clear, water-soluble fabric with a biro. Onto the water soluble fabric I placed scraps of pink, white and black chiffon, pink, sparkly yarn, and designs cut from some scrap lace. The bottom edge of the front flap is entirely existing lace. I affixed these items to the water-soluble fabric with a bit of water, which made the surface gluey enough to hold them in place.

Next step was to fill in the template area with circles and circles of overlapping machine embroidery in black thread, taking care to interlock all of the embroidery and to fill all of the template. Once this was done I went around the edges with a close zigzag stitch in white thread, to provide contrast with the main body of the machine lace and to match against the scrap lace.

Sewing done that next step was to wash away the water-soluble fabric, warm water and gentle rubbing got rid of most of the fabric. A certain amount of it remained in the threads as a gluey substance which would then dry and add stability to the final shape. I left the machine lace to dry, formed around a pack of cards. When it was dry I sewed it along the seams into it’s final shape.

I was worried about the robustness of machine lace as a hardy case for a gadget, but so far it seems to be holding up. The gadget itself has a hard case to protect itself, so that wasn’t a consideration. And my gadget looks so, so pretty now.


What I've been tagging...

What I've been taking pictures of...

RSS What I’ve been listening to…

  • An error has occurred; the feed is probably down. Try again later.